Grocery Store Starts
Chinese cabbage regrowing from the base.
We are all for reducing waste, and one way you can do this in the garden is by turning your kitchen scraps into food-producing plants. Whether you want to dot your landscape with pineapple plants, start a windowsill lettuce patch, or have a never-ending supply of root veggies, all these goals can be accomplished with a piece of plant material from the grocery store and a bit of patience.
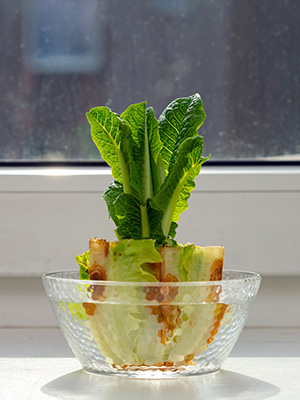
Celery, Romaine, and Bok Choy
Celery, romaine lettuce, and bok choy can be cultivated using the same method. Start by cutting the edible portions off, leaving the root end a couple inches tall. Then, select an appropriately sized dish to grow your plant in. Half an inch of the base should be submerged in water. A jar may be ideal for celery, while a bowl will likely work best for romaine and bok choy. Fill your dish with water, submerge the base, and place it in a sunny location such as your kitchen windowsill. Be sure to change the water every couple of days. You can also plant them in potting soil if you prefer. Depending on what you’re growing, you might see new growth in a few days, or it could be weeks. You can choose to keep harvesting from your window plant, or you can transfer it to your garden once a strong root system appears for better yields.
Pineapple
Pineapples are exceptionally easy to grow; all you need is a fruit. When you go to slice it, save the “crown” which includes the leaves and one half to three quarters of an inch of fruit. Remove (and use!) any excess fruit and a couple of the lower leaves to expose the pre-formed roots. Allow the crown to “heal” for a day or two indoors before planting. This helps to prevent rotting from excess moisture and deter fruit-loving wildlife from digging it up. Once the pineapple top is healed, plant it three to four inches deep in a well-drained container with good potting soil.
Ginger and Turmeric
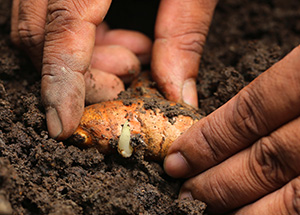
Planting a turmeric rhizome piece.
If you have some leftover ginger or turmeric, consider adding it to your garden. Simply cut the rhizome into pieces that are an inch to an inch and a half long and let them dry for a few days to prevent rotting. Each piece should have at least one “eye,” which is where the plant will sprout from. Next, plant the rhizome pieces 15 inches apart and a couple inches deep. Keep the soil moist and look for sprouts a few weeks later.
Garlic
Garlic can be planted for the greens or bulbs. Either way, start by separating a garlic bulb into individual cloves. Then, plant each clove a couple inches deep in a pot or in your garden. Keep the soil moist and ensure your plant will get plenty of sunlight. If you only want greens, just snip them as needed. For bulbs, wait to harvest until about half the leaves have dried and bent towards the ground.
Scallions and Onions
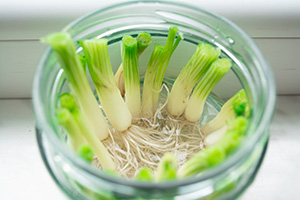
Did you know that buying scallions or onions once can provide a never-ending supply? For scallions, simply cut off the lower third of the vegetable that contains the roots. Then, place it in a glass and fill with water until half the stalk is submerged. Keep the glass on your windowsill, swap out the water every few days, and you have a continual source of scallions.
The process for bulb onions is slightly different. Cut one third of the bulb off from the root end. Allow the piece to dry for a day or two until the surface begins to shrivel. Then, plant the onion in a container or in your garden by placing it root-side-down and covering with an inch of soil. You can choose to either harvest the green shoots or separate the buds at the base of each green shoot and plant them. The buds will then grow into bulbs.
Beets and Turnips
Instead of growing from the base like onions, beets and turnips grow from the tops. For greens, cut about a third of the beet or turnip root off from the top. Then, place the scrap cut-end-down in a container of water so it is just submerged. You’ll soon see greens appearing if you keep it in a sunny location and change the water every couple of days. If you’d like more roots, plant the top in soil instead with the cut side facing down. Care for it as you would a traditional plant, and you’ll soon have more beets or turnips growing beneath ground.
Herbs
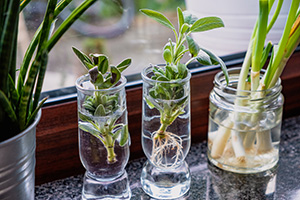
Buying herbs at the grocery store can be expensive, so why not make it a one-time purchase? Mint, marjoram, oregano, and sage can all be easily propagated at home. Simply strip the leaves from the lower half of the stem and place it in a cup of water (keeping the leaves out of the water). Over the span of a few weeks, roots will start to appear. Wait until the roots start growing secondary branches before transferring the plant to soil.
Be sure to add any leftover food scraps to your compost pile! If you have any questions as you cultivate your grocery store starts, feel free to reach out to the experts at your county Extension office for advice.
Also on Gardening Solutions
- Beets
- Cabbage
- Garlic
- Ginger
- Herbs in the Florida Garden
- Lettuce
- Onions and Shallots
- Pineapple
- Turmeric
- Turnips